How To Find Web Server Ip Address In Wireshark
A web server is an application that delivers content to a user’s browser. A web server is like a mail server, except it delivers HTML and other media files instead of text. The most common type of web server is Apache, which is a free open source software package.
There are many ways to find out the IP address of your website’s web server. You can use the command line tool ping to check for an IP address and then look up the domain name IP address using Google’s DNS lookup tool. You can also use Wireshark to find the IP address of your web server.
Using ping:
How To Find Web Server Ip Address In Wireshark
When a host is infected or otherwise compromised, security professionals need to quickly review packet captures (pcaps) of suspicious network traffic to identify affected hosts and users.
This tutorial offers tips on how to gather that pcap data using Wireshark, the widely used network protocol analysis tool. It assumes you understand network traffic fundamentals and will use these pcaps of IPv4 traffic to cover retrieval of four types of data:
- Host information from DHCP traffic
- Host information from NetBIOS Name Service (NBNS) traffic
- Device models and operating systems from HTTP traffic
- Windows user account from Kerberos traffic
Host Information from DHCP Traffic
Any host generating traffic within your network should have three identifiers: a MAC address, an IP address, and a hostname.
In most cases, alerts for suspicious activity are based on IP addresses. If you have access to full packet capture of your network traffic, a pcap retrieved on an internal IP address should reveal an associated MAC address and hostname.
How do we find such host information using Wireshark? We filter on two types of activity: DHCP or NBNS. DHCP traffic can help identify hosts for almost any type of computer connected to your network. NBNS traffic is generated primarily by computers running Microsoft Windows or Apple hosts running MacOS.
The first pcap for this tutorial, host-and-user-ID-pcap-01.pcap, is available here. This pcap is for an internal IP address at 172.16.1[.]207. Open the pcap in Wireshark and filter on bootp as shown in Figure 1. This filter should reveal the DHCP traffic.
Note: With Wireshark 3.0, you must use the search term dhcp instead of bootp.
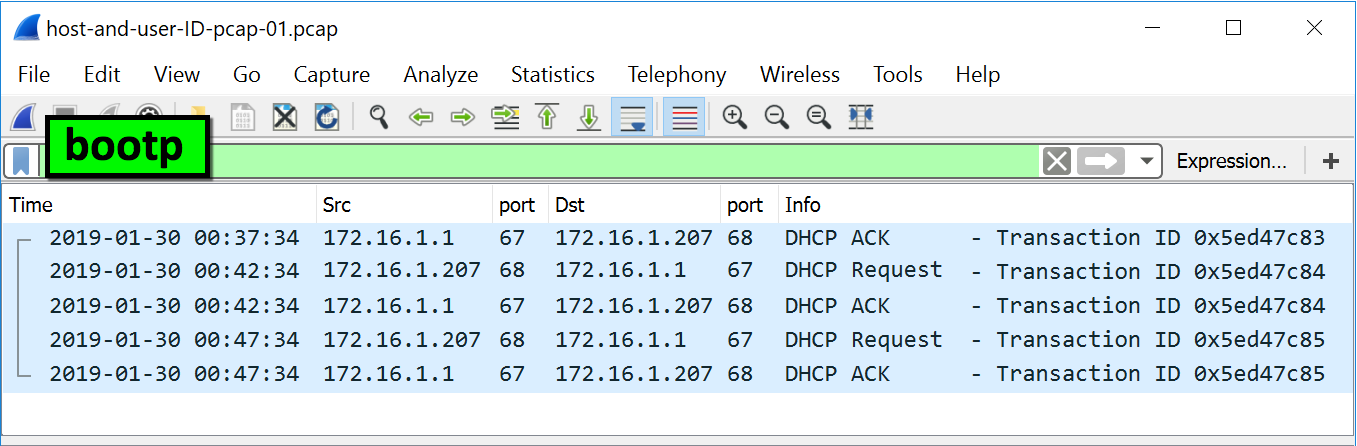
Figure 1: Filtering on DHCP traffic in Wireshark
Select one of the frames that shows DHCP Request in the info column. Go to the frame details section and expand the line for Bootstrap Protocol (Request) as shown in Figure 2. Expand the lines for Client Identifier and Host Name as indicated in Figure 3. Client Identifier details should reveal the MAC address assigned to 172.16.1[.]207, and Host Name details should reveal a hostname.
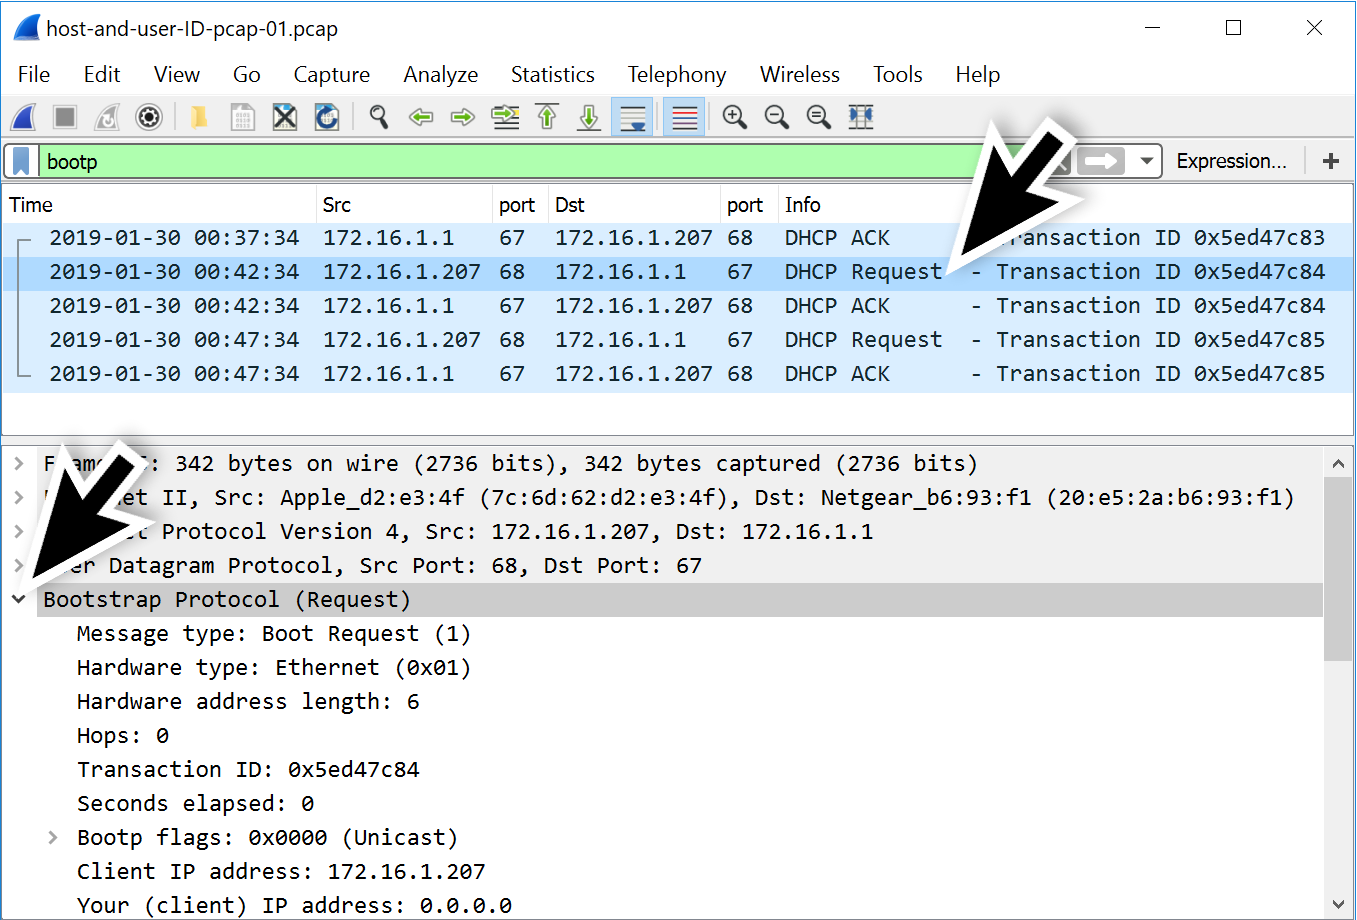
Figure 2: Expanding Bootstrap Protocol line from a DHCP request
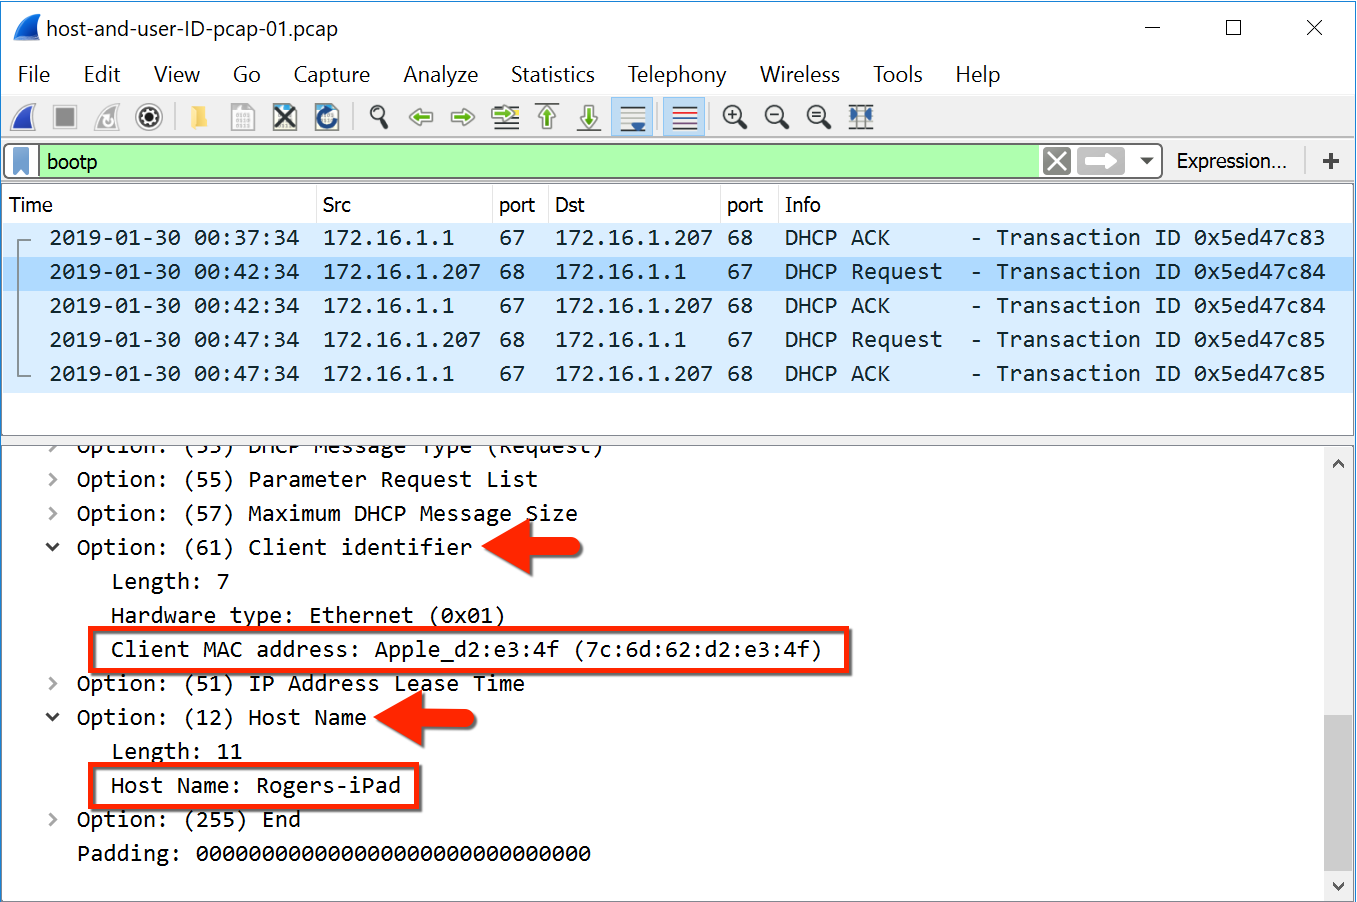
Figure 3: Finding the MAC address and hostname in a DHCP request
In this case, the hostname for 172.16.1[.]207 is Rogers-iPad and the MAC address is 7c:6d:62:d2:e3:4f. This MAC address is assigned to Apple. Based on the hostname, this device is likely an iPad, but we cannot confirm solely on the hostname.
We can easily correlate the MAC address and IP address for any frame with 172.16.1[.]207 as shown in Figure 4.
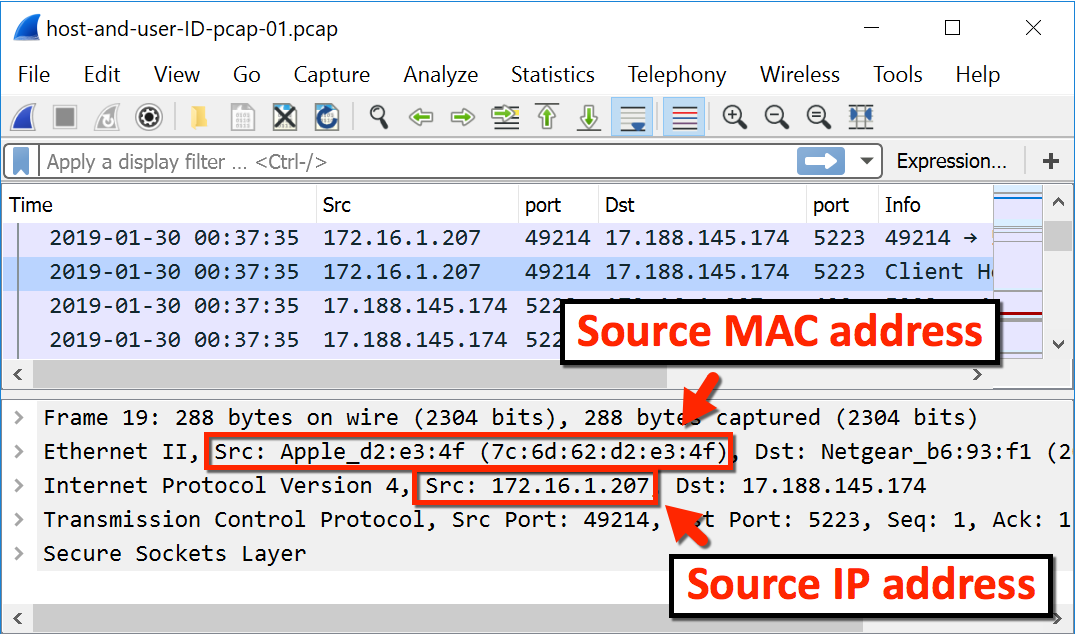
Figure 4: Correlating the MAC address with the IP address from any frame
Host Information from NBNS Traffic
Depending on how frequently a DHCP lease is renewed, you might not have DHCP traffic in your pcap. Fortunately, we can use NBNS traffic to identify hostnames for computers running Microsoft Windows or Apple hosts running MacOS.
The second pcap for this tutorial, host-and-user-ID-pcap-02.pcap, is available here. This pcap is from a Windows host using an internal IP address at 10.2.4[.]101. Open the pcap in Wireshark and filter on nbns. This should reveal the NBNS traffic. Select the first frame, and you can quickly correlate the IP address with a MAC address and hostname as shown in Figure 5.
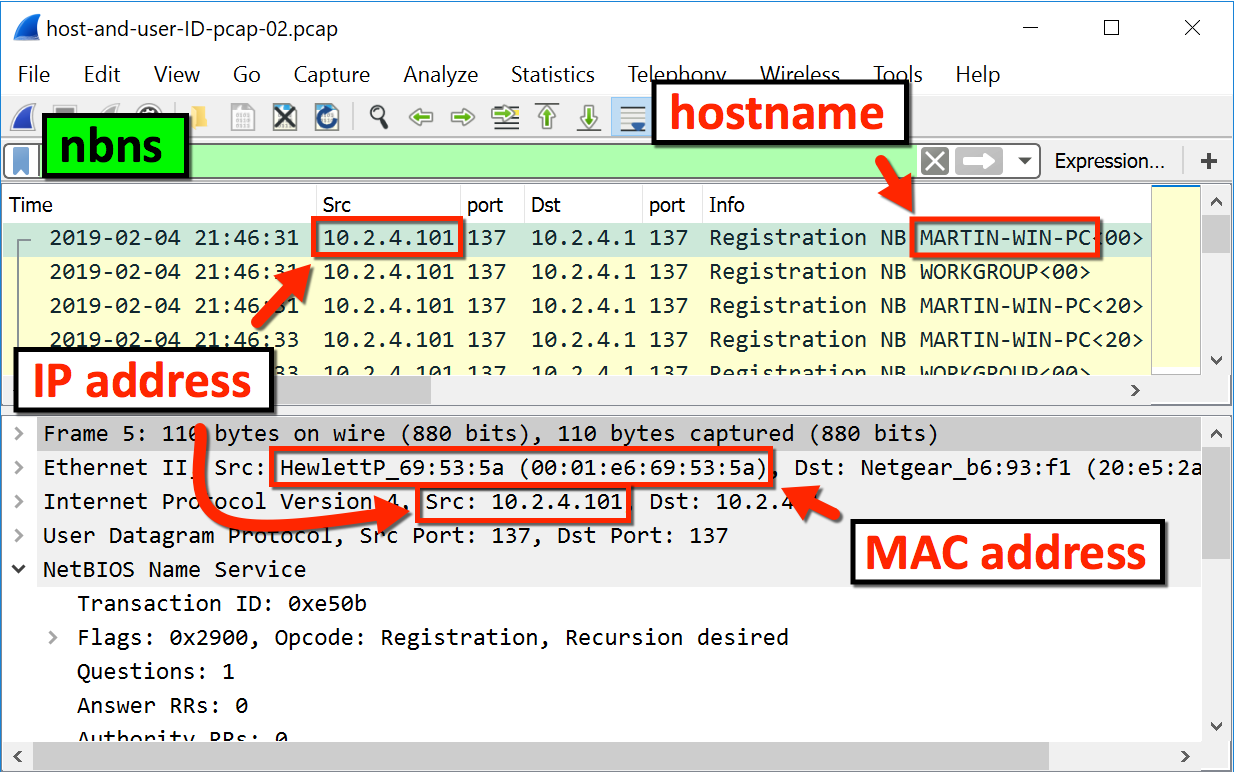
Figure 5: Correlating hostname with IP and MAC address using NBNS traffic
The frame details section also shows the hostname assigned to an IP address as shown in Figure 6.
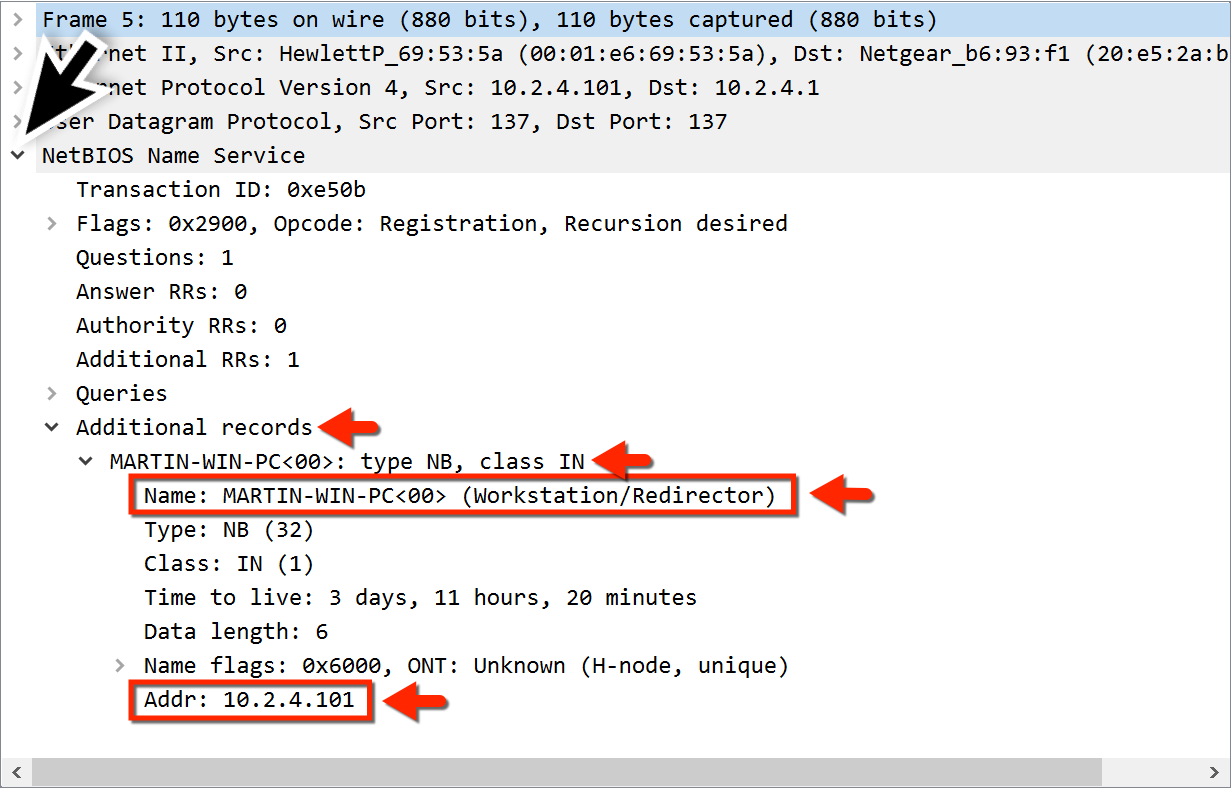
Figure 6: Frame details for NBNS traffic showing the hostname assigned to an IP address
Device Models and Operating Systems from HTTP Traffic
User-agent strings from headers in HTTP traffic can reveal the operating system. If the HTTP traffic is from an Android device, you might also determine the manufacturer and model of the device.
The third pcap for this tutorial, host-and-user-ID-pcap-03.pcap, is available here. This pcap is from a Windows host using an internal IP address at 192.168.1[.]97. Open the pcap in Wireshark and filter on http.request and !(ssdp). Select the second frame, which is the first HTTP request to www.ucla[.]edu, and follow the TCP stream as shown in Figure 7.
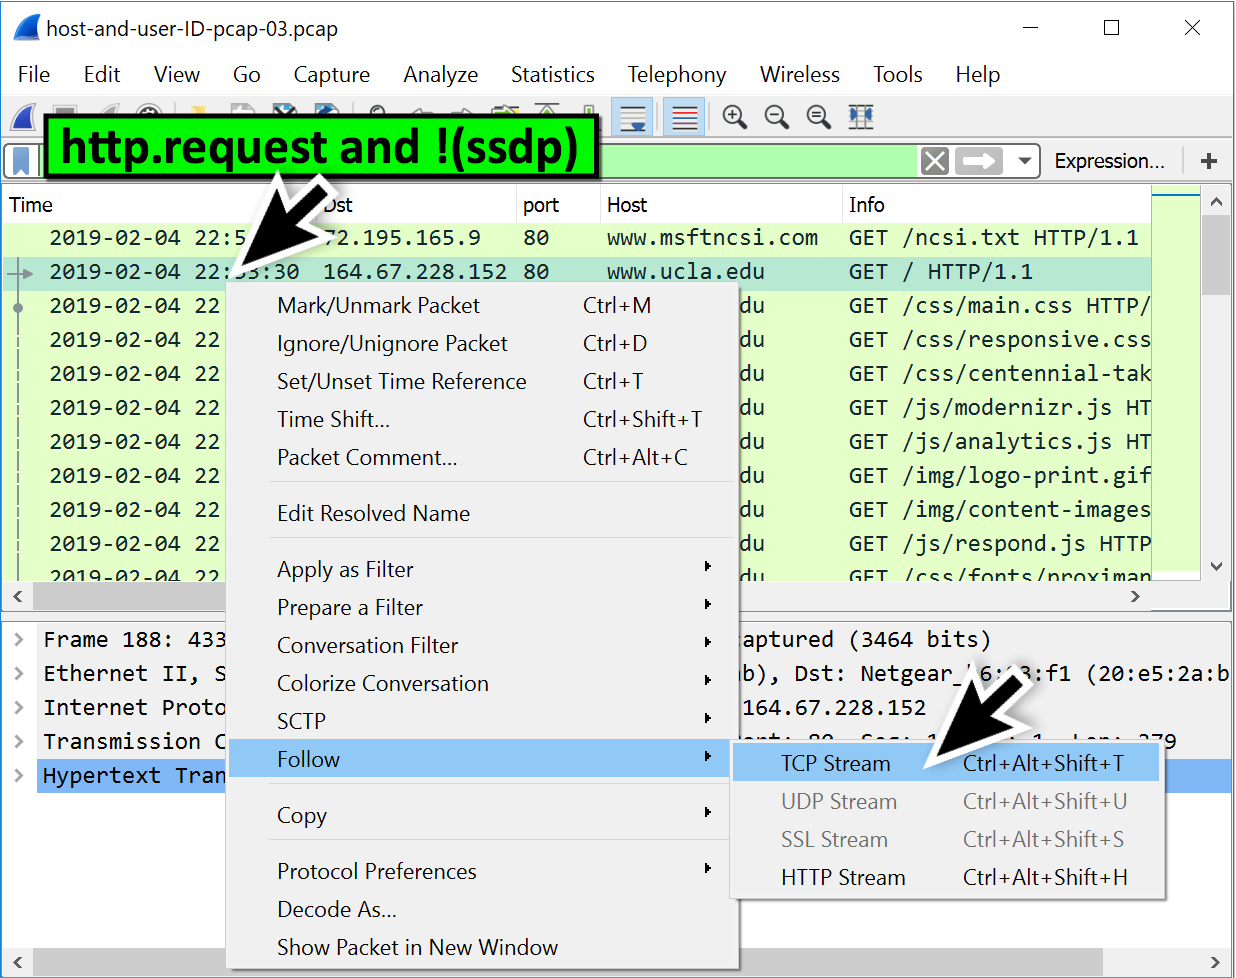
Figure 7: Following the TCP stream for an HTTP request in the third pcap
This TCP stream has HTTP request headers as shown in Figure 8. The User-Agent line represents Google Chrome web browser version 72.0.3626[.]81 running on Microsoft’s Windows 7 x64 operating system.
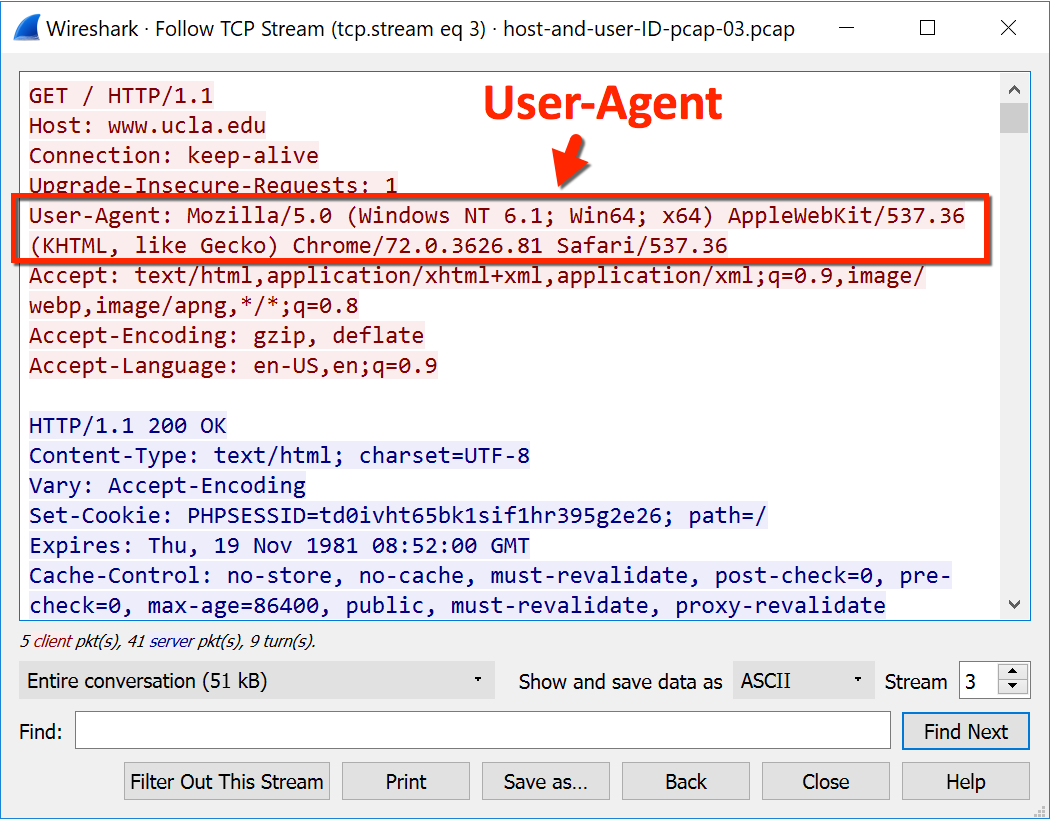
Figure 8: The User-Agent line for a Windows 7 x64 host using Google Chrome
Note the following string in the User-Agent line from Figure 8:
(Windows NT 6.1; Win64; x64)
Windows NT 6.1 represents Windows 7. For User-Agent lines, Windows NT strings represent the following versions of Microsoft Windows as shown below:
- Windows NT 5.1: Windows XP
- Windows NT 6.0: Windows Vista
- Windows NT 6.1: Windows 7
- Windows NT 6.2: Windows 8
- Windows NT 6.3: Windows 8.1
- Windows NT 10.0: Windows 10
With HTTP-based web browsing traffic from a Windows host, you can determine the operating system and browser. The same type of traffic from Android devices can reveal the brand name and model of the device.
The fourth pcap for this tutorial, host-and-user-ID-pcap-04.pcap, is available here. This pcap is from an Android host using an internal IP address at 172.16.4.119. Open the pcap in Wireshark and filter on http.request. Select the second frame, which is the HTTP request to www.google[.]com for /blank.html. Follow the TCP stream as shown in Figure 9.
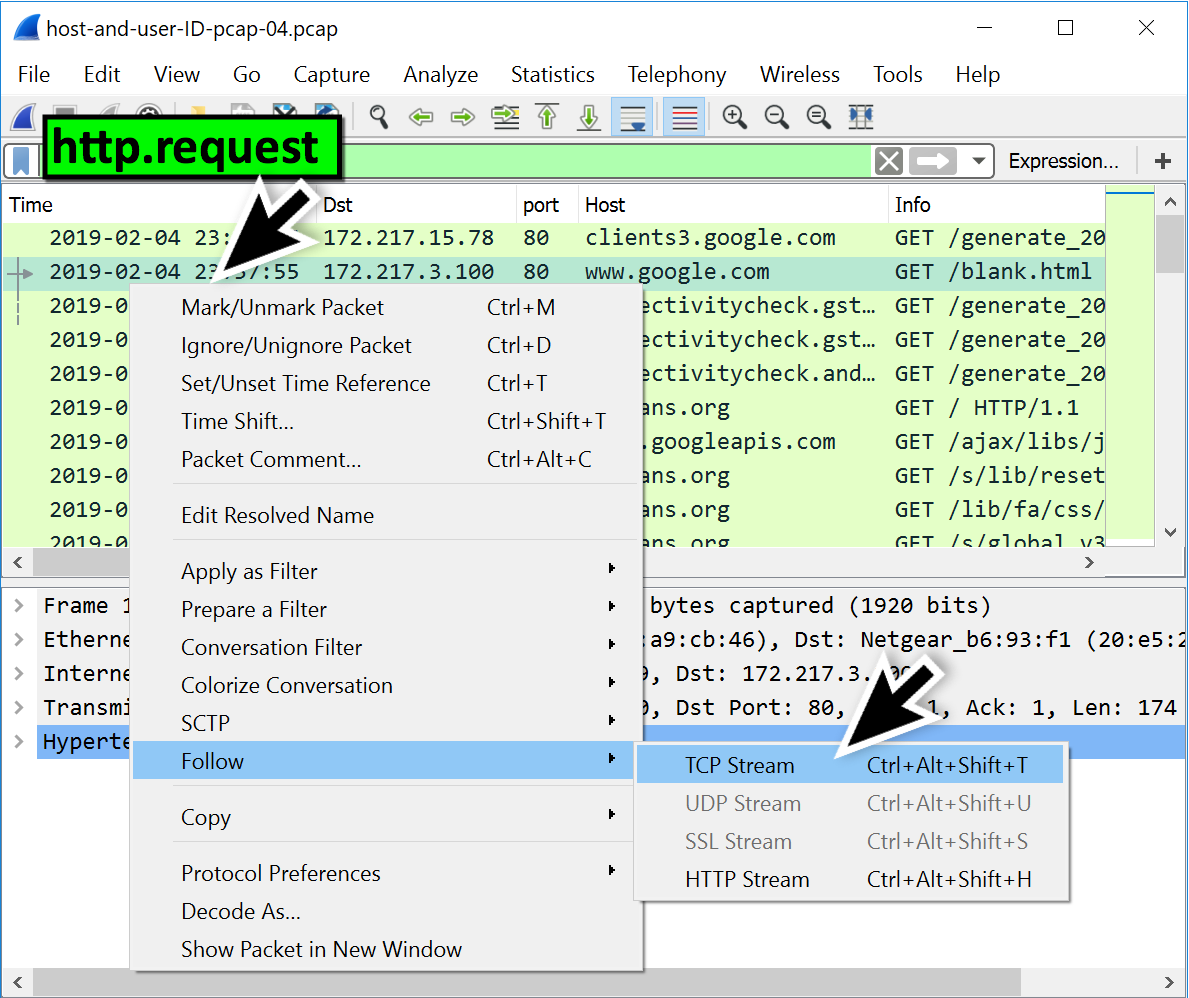
Figure 9: Following the TCP stream for an HTTP request in the fourth pcap
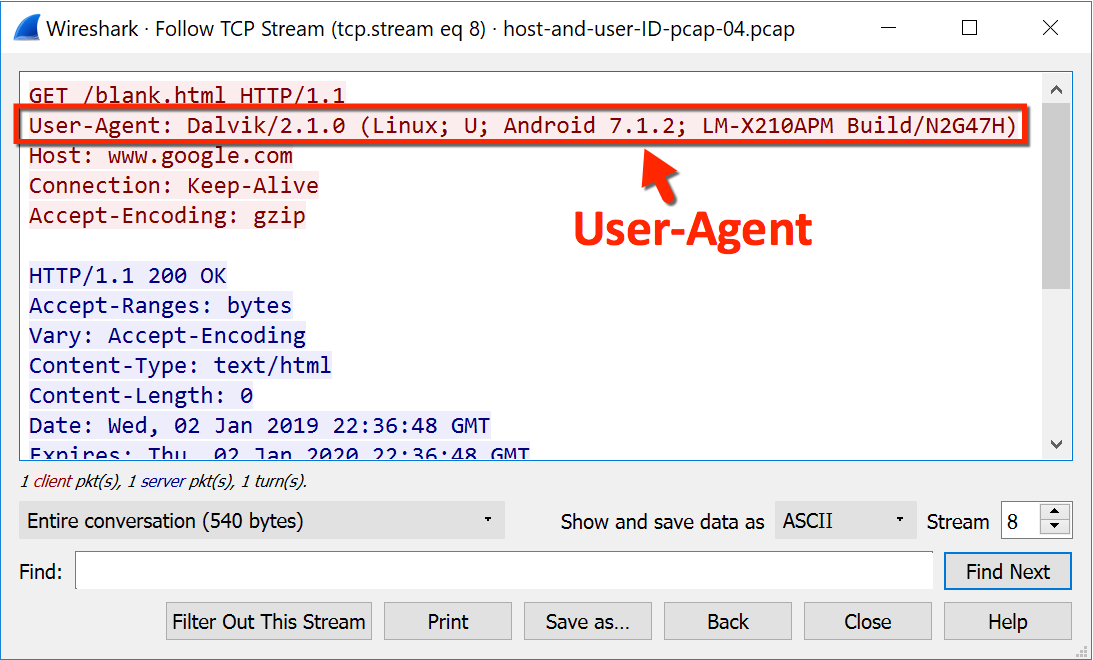
Figure 10: The User-Agent line for an Android host using Google Chrome
The User-Agent line in Figure 10 shows Android 7.1.2 which is an older version of the Android operating system released in April 2017. LM-X210APM represents a model number for this Android device. A quick Google search reveals this model is an LG Phoenix 4 Android smartphone.
The User-Agent line for HTTP traffic from an iPhone or other Apple mobile device will give you the operating system, and it will give you the type of device. However, it will not give you a model. We can only determine if the Apple device is an iPhone, iPad, or iPod. We cannot determine the model.
The fifth pcap for this tutorial, host-and-user-ID-pcap-05.pcap, is available here. This pcap is from an iPhone host using an internal IP address at 10.0.0[.]114. Open the pcap in Wireshark and filter on http.request. Select the frame for the first HTTP request to web.mta[.]info and follow the TCP stream as shown in Figure 11.
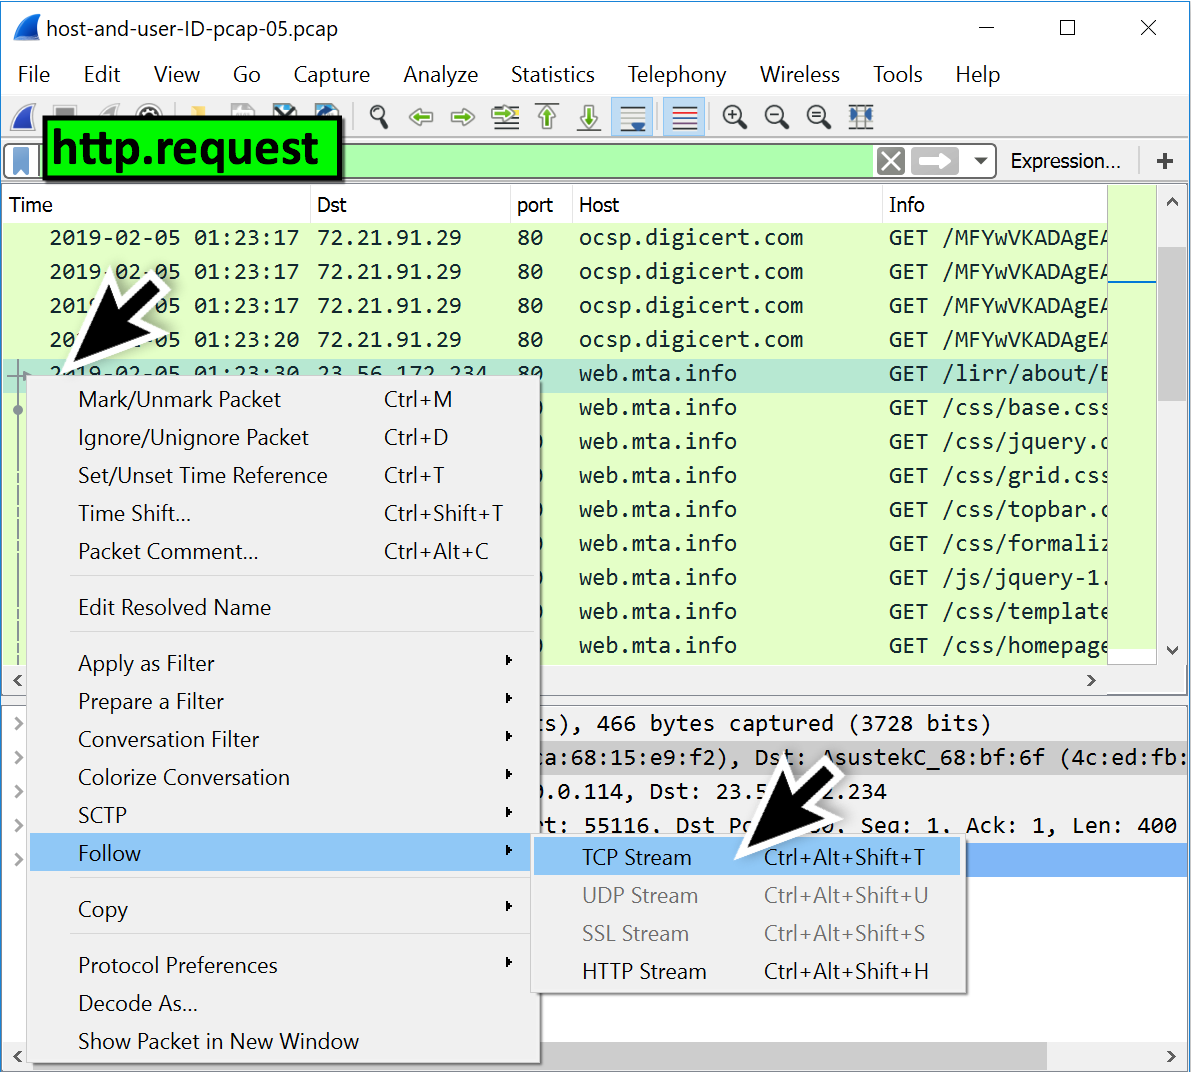
Figure 11: Following the TCP stream for an HTTP request in the fifth pcap
In Figure 12, the User-Agent line shows (iPhone; CPU iPhone OS 12_1_3 like Mac OS X). This indicates the Apple device is an iPhone, and it is running iOS 12.1.3.
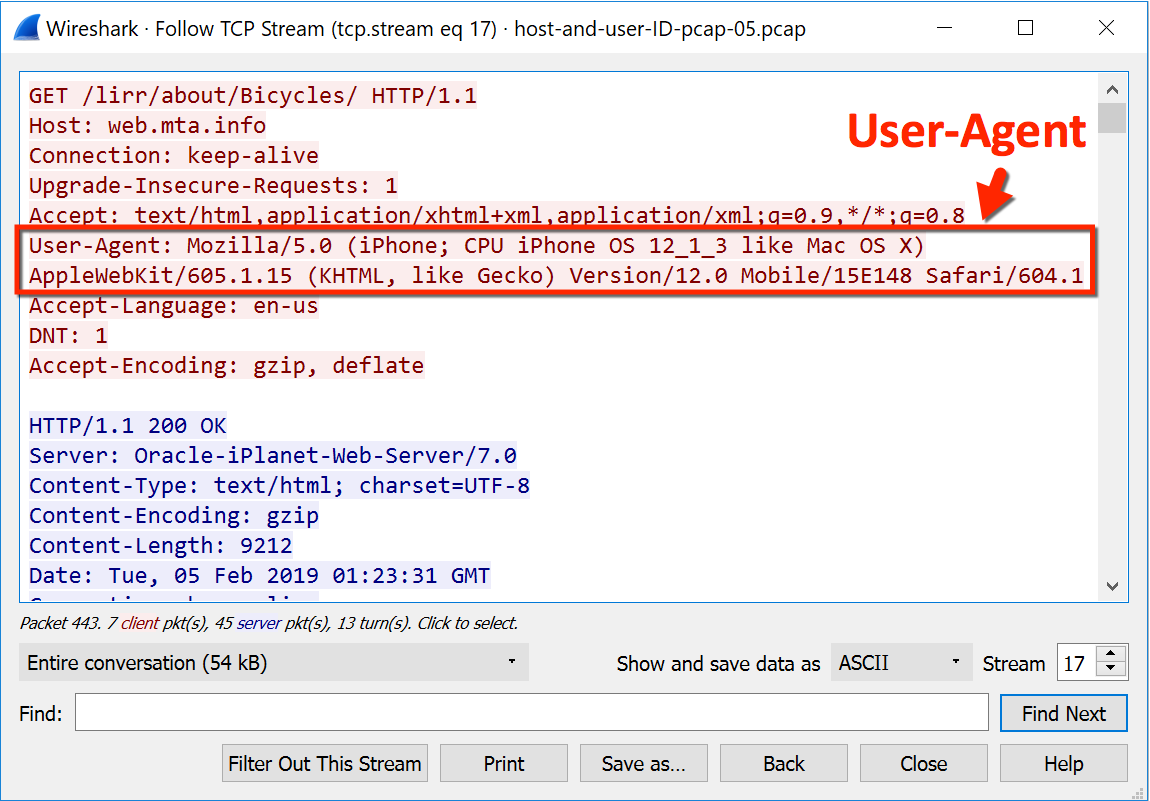
Figure 12: The User-Agent line for an iPhone using Safari
A final note about HTTP traffic and User-Agent strings: not all HTTP activity is web browsing traffic. Some HTTP requests will not reveal a browser or operating system. When you search through traffic to identify a host, you might have to try several different HTTP requests before finding web browser traffic.
Since more websites are using HTTPS, this method of host identification can be difficult. HTTP headers and content are not visible in HTTPS traffic. However, for those lucky enough to find HTTP web-browsing traffic during their investigation, this method can provide more information about a host.
Windows User Account from Kerberos Traffic
For Windows hosts in an Active Directory (AD) environment, we can find user account names in from Kerberos traffic.
The sixth pcap for this tutorial, host-and-user-ID-pcap-06.pcap, is available here. This pcap is from a Windows host in the following AD environment:
- Domain: happycraft[.]org
- Network segment: 172.16.8.0/24 (172.16.8[.]0 – 172.16.8[.]255)
- Domain controller IP: 172.16.8[.]8
- Domain controller hostname: Happycraft-DC
- Segment gateway: 172.16.8[.]1
- Broadcast address: 172.16.8[.]255
- Windows client: 172.16.8[.]201
Open the pcap in Wireshark and filter on kerberos.CNameString. Select the first frame. Go to the frame details section and expand lines as shown in Figure 13. Select the line with CNameString: johnson-pc$ and apply it as a column.
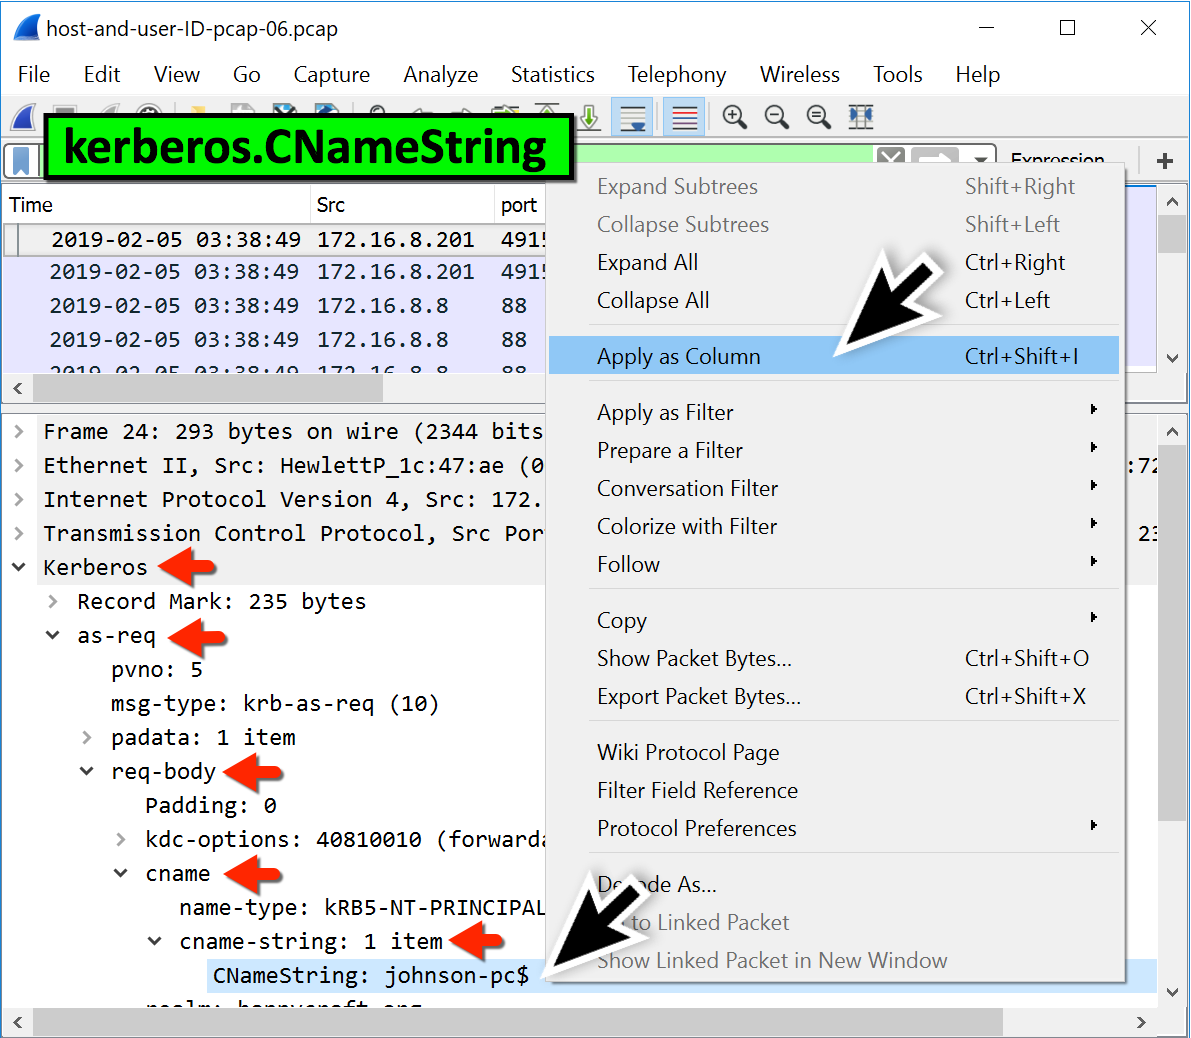
Figure 13: Finding the CNameString value and applying it as a column
This should create a new column titled CNameString. Scroll down to the last frames in the column display. You should find a user account name for theresa.johnson in traffic between the domain controller at 172.16.8[.]8 and the Windows client at 172.16.8[.]201 as shown in Figure 14.
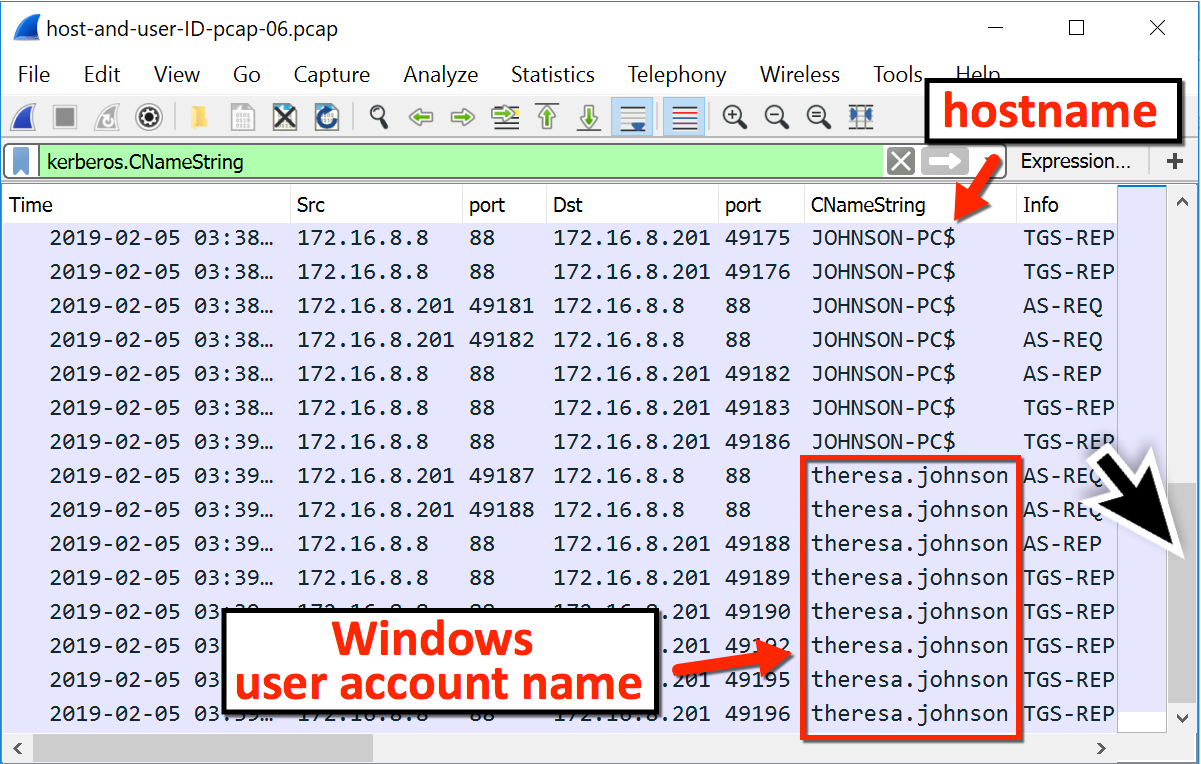
Figure 14: Finding the Windows user account name
CNameString values for hostnames always end with a $ (dollar sign), while user account names do not. To filter on user account names, use the following Wireshark expression to eliminate CNameString results with a dollar sign:
kerberos.CNameString and !(kerberos.CNameString contains $)
Summary
Proper identification of hosts and users from network traffic is essential when reporting malicious activity in your network. Using the methods from this tutorial, we can better utilize Wireshark to help us identify affected hosts and users.
how to use wireshark to monitor an ip address
If you want to monitor network traffic, you need a utility called Wireshark which lets you see exactly what’s going on between your computers and network devices.
Monitoring network traffic isn’t something beneficial only for large businesses. It can be just as useful on home networks as well. You could troubleshoot problems, discover exactly what’s connected and what type of data is being sent across the network.
There are many utilities which do a similar job, but we’re going to use Wireshark which is free. However, it is quite complicated so you might want to try others to see if you get on better with them. It’s worth noting that you can’t see the actual data – you won’t know if someone’s streaming Breaking Bad, for example – but you will be able to see which websites are being accessed (albeit by their IP addresses).
A few alternatives include Angry IP Scanner, PRGT Network Monitor, Fiddler and ZenMap.
Using these tools you can keep an eye on everything coming and going from a specific computer, but you can also install it on remote computers and monitor them as well.
Just make sure you have permission to do this: such tools can be used for ‘evil’ but we’re explaining how to monitor traffic in the hope you can see what’s normal and what could be an issue. And as we’ve said, capturing and viewing network traffic in this way isn’t for beginners. If you don’t know what a MAC address or IP address is, then the data is going to be meaningless.
How to use Wireshark to monitor network
Download and install Wireshark which is available for Windows, macOS and some Linux distros.

Launch Wireshark and click the “Start” from within the ‘Capture’ section which is on the left hand side of the interface.

Click Stop (the red square) to stop recording network traffic.

Each line represents a packet, and there are 7 columns that provide information about it.
- The first gives each packed a number so you can keep track.
- Time is when the packet was received.
- The source includes the Internet Protocol (IP) address of the packet’s origin.
- The destination IP records where a packet is going.
- The protocol the packet uses such as TCP, UDP and HTTP.
- Length tells you the packets size in bytes.
- Information provides an extra details such as if a packed is application data.

This is how to capture network traffic in the simplest way – it is the traffic on your own computer. If you wish to capture traffic from another then you must switch on ‘Promiscuous’ mode from within the Capture options. You can tweak settings, including IP address from within Capture filters. Check out Wireshark’s page for for information.